I.T.C.A.
EVENT MANAGEMENT
AUDIOVISUAL ENGINEERING
VIDEO PRODUCTION
As a proven leader in the Broadcast video after-sales service, in this section, we can offer you tips and advice on professional video equipment.
You can contact us by email or via facebook if you need additional details, or for tips to be given in other areas.
Missing digits / Digit deletion
Inner Drum / Channel Condition issues
■ With the HVR - A1, V1, Z1, Z5, Z7, DCR-VX- 2000, 2100, DSR-PD-150, 170, HDR-FX7 cameras (not exhaustive):
If you encounter frequent issues with the flange back adjustment (that is to say you can no longer have a proper focus in manual mode but only in automatic, or if your focus is sharp when you zoom in, it gets soft when you zoom out...) the flange back is defective and needs adjusting.
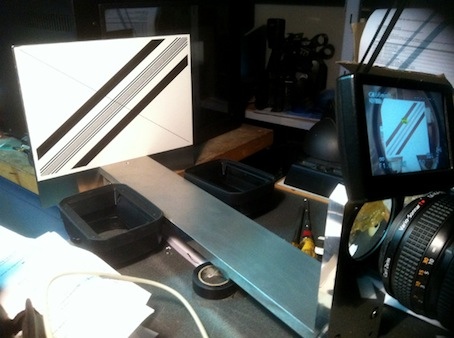
A defective flange back is a common fault on these cameras. Their lens is designed with no back focus ring, that means that you cannot adjust it mechanically but only electronically. Therefore to fix it you can only pass through a station with a specific back focus chart and a specific software to control and redo the settings with their link plug.
You can have these adjustments made in our workshop for a fix rate of €160. Please contact us for any request.
If when using the zoom you can't focus anymore, you need to update the firmware.
Install the latest firmware, the function "flange back adjustment" is now displayed in the menu, click and proceed.
■ Using a Beatcam cleaning tape, BCT-5 CLN, on a Digital Betacam (DVW, MSW…) :
So that the tape is recognized without being rejected (due to non-digital cleaner tape), press the play button and hold it before inserting the tape. You can then run the tape cleaner.
■ Missing time-code digits or digit deletion on all VCRs Digital Beta's displays :
This fairly common problem comes from the LED holders which melt and cut the conductor tracks because of the heat.
To solve it : remove the holders (you can possibly change), repair the conductor tracks, then clean gently the contacts. The missing digits are displayed again.
■ Extending the lifespan of an inner drum (for DigiBeta, HD and other recorder)
When the channel condition of your videotape recorder turns red, errors are no longer compensated (green = OK, amber = compensated errors, red = uncompensated errors). Sony suggests you replace the inner drum of your now unusable recorder, though it is possible to extend its lifespan over hundreds of hours.
To proceed, go to the Maintenance menu, then to Equalisation.
Put your camera in manual mode, then insert a tape (ideally a test tape).
With the jog shuttle wheel, minimize the number of chevrons ">" on heads A and D, then do same on heads B and C.
Save.
Your recorder should now have its green channel condition for several hours.
■ This tip also works when a tape cannot be read properly by the recorder (because recorded with a defective camera, compatibility problems, non-standard tape…). Proceed the same way as above without the final memorization. It enables to read the tape without pixelation or channel condition. Then turn off the recorder and turn it on again to restore back the previous settings.
■ For your wall plugs and power strips :
If the safety feature is too hard and you have difficulties to insert the plug, put a drop of linseed oil. Security feature will always be optimal, but you do not have to force to connect them.
■ With Sony HVR-V1U, HVR-A1E, HVR-Z5E and HVR-Z7E cameras :
If your camera is not responding to commands or is not working properly (doesn't stop unless you remove the battery, no longer wants to REC or turns REC by itself... finally all the non-compliant random functions), change the internal battery and everything will get back to normal.
■ If you have the same symptoms but with the Sony DSR-500 and DSR-570 cameras : change the IDE connector CN-1811.
You have to know that with no pixel compensation, all the blocks and CCD sensors look like a starry summer night sky. An image with no defective pixel can be obtained by the compensation of the pixels and their storage, that's the reason why all the cameras have in their menus (user or service) an application to perform a "pixel compensation".
To perform it in the best possible way, the CCD must be very warm. Tip : before starting the procedures, wrap the camera in an electric blanket or warm it up with a hair dryer.
■ For Sony cameras , the automatic pixel compensation can be performed by holding down the black balance button three time. Please note this feature is limited to a dozen times. After, it is no longer possible. The manufacturer will tell you that the CCD block must be replaced or that the camera must be sent in a unique center in Europe etc...
■ For Sony HDW-730 / 750P cameras
There is a hidden menu undisclosed by the manufacturer named Service 2. It enables you to completely clear the pixel compensation memory (caution that's impressive ! your CCD sensors will look like a starry sky) to perform and store them again, or to get the defective pixels (or dead pixels) one by one to delete them.
To get this hidden menu, switch S1-1 and S1-5 to ON in the camera, a new menu named Service 2 is now displayed.
>> Service 2 menu operation procedures
The only way to perform a white balance :
■ Step 1: Perform a black balance
- Set the iris to manual, then close completely the diaphragm ("C" position). Check in the viewfinder there's no light in.
- Hold down the black-balance (BLK) button once. Check the various steps in the viewfinder while the camera is completing the operation.
■ Step 2: Filter choice
- Set your camera to auto-iris, then adjust the filter wheel until the range of aperture is in-between -or at the nearest of- 5,6 and 8.
■ Step 3: Perform a white balance
- Take a piece of polystyrene (the only reference of true white ! Never use printable papers, they are watermarked with all a different main white colour).
- Point your camera at about 3 meters of the piece of polystyrene, then frame it without tempting to focus it perfectly.
- Hold down the white-balance (WHT) button once. Check the various steps in the viewfinder while the camera is completing the operation.
I.T.C.A.
99 rue Tête d'Or, 69006 Lyon, France